
Is it imperative that you know how to tie knots before you start hammock camping? Well, no. There are a few hammock manufacturers that have “No-Knot Systems” that contain straps and carabiners – great for beginners just getting into hammock camping or day hikers looking for a simple, fuss-free system. Not a thing wrong with that. However, learning how to tie knots will help you in many areas of your life. These knots aren’t just used in camping. They are helpful to know in a variety of different life situations. Plus, they are fun to learn and a good life skill to have.
Reasons to Use Knots for Your Hammock
The “No-Knot Systems” work well for some. Others need a bit more adjustability and flexibility in their hammock setup. Knowing a couple of basic camping knots will give you that. I recommend learning as many knots as you can, but if the basics are all you learn, more than just a few, it’s better than knowing none at all.
Trust me. You will want to know how to tie at least a few of these knots if you plan to camp and sleep overnight in your hammock. Why?
First, let me get into the areas of hammock camping that you may need to know knot tying. Then I’ll show you some useful knots and how to tie them. There will also be a list of situations that may require the use of each particular knot.
The Continuous Ridgeline (CRL)
Continuous Ridgeline, or CRL, is a single continuous line of rope or cordage strung above your hammock. The CRL has a variety of uses. For instance, it comes in handy to suspend your bug net to keep it off your face while you sleep. All bug nets have small hooks or clips that connect to the ridgeline, which makes setting up user-friendly.
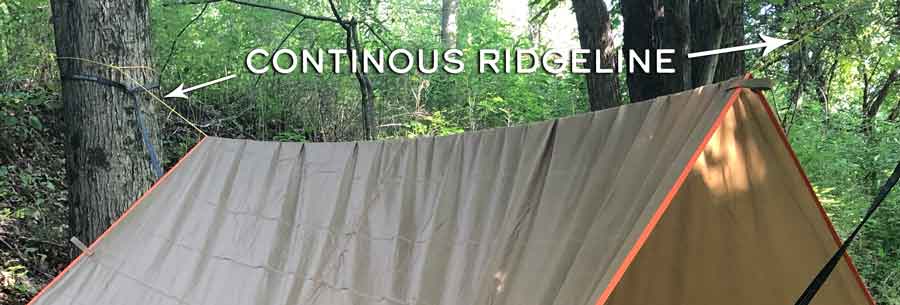
A continuous ridgeline can also be an option to suspend your tarp in the case of rain or other harsh weather. Throw the tarp over the ridgeline and stake the corners down. You can’t always predict the weather, so it’s better to be safe and have a tarp above you to protect you from the elements. Of course, the CRL isn’t the only way to set up your tarp, but it’s a great one to keep in mind just in case.
There are multiple options when it comes to knots to use for a continuous ridgeline. We will get into that down below in a minute.
The Separated Ridgeline (SRL)
Separated Ridgeline or SRL, is just as it sounds – separated. If you don’t want rope or cordage stretching the entire length of your hammock, the SRL is the way to go. This way, you can hang your tarp from each end. The advantage of using a separated ridgeline as opposed to a continuous ridgeline is that it may help to keep you drier if it rains since there isn’t a rope overhead dripping down into your hammock.
As with the CRL, there are multiple options when it comes to knots to use for a separated ridgeline and more will be detailed below.
Guylines
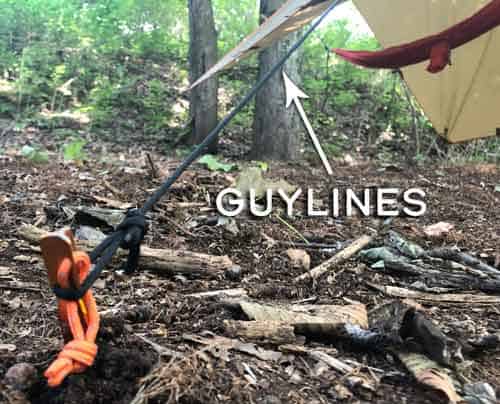
Guylines are the lines of rope or cordage attached to the corners of your tarp that provide tension to keep the tarp taut and free from sag when connected to the stakes in the ground.
Straps
Almost all the hammock straps on the market have loops built into the straps, which makes it super easy to connect and forget it. You will need to do a simple knot to secure the straps around the trees and then pull the hammock through the end loop. The simple knot is a lark’s head knot.
Hammock straps with built-in loops aren’t necessary to have. If you are looking for a more budget-friendly option, you can get some 30 foot by 1-inch nylon webbing straps for around ten bucks. Of course, if you go with this option, you will need to know a few knots to get a proper hang. No big deal, I’ve got you covered – the complete instructions for the knots you will need to know are in this article.
Now that we have gone over some of the most common reasons to use knots for hammock camping, let’s get into the essential camping knots, how to tie them, and how to use them.
Read More: Can You Safely Connect Two Hammock Straps?
Knots for Hammock Camping
Half Hitch & Double Half Hitch
The half hitch is a fundamental and easy beginner knot that everyone should know. It’s typically used to secure a line to something else. I should note my reasoning for lumping the half hitch and double half hitch together. It is because a single half hitch is rarely used on its own because it is not secure as a single knot and can slide. You can tie other knots in tandem to secure your original half hitch, but most of the time, you can just do another half hitch behind the first one.
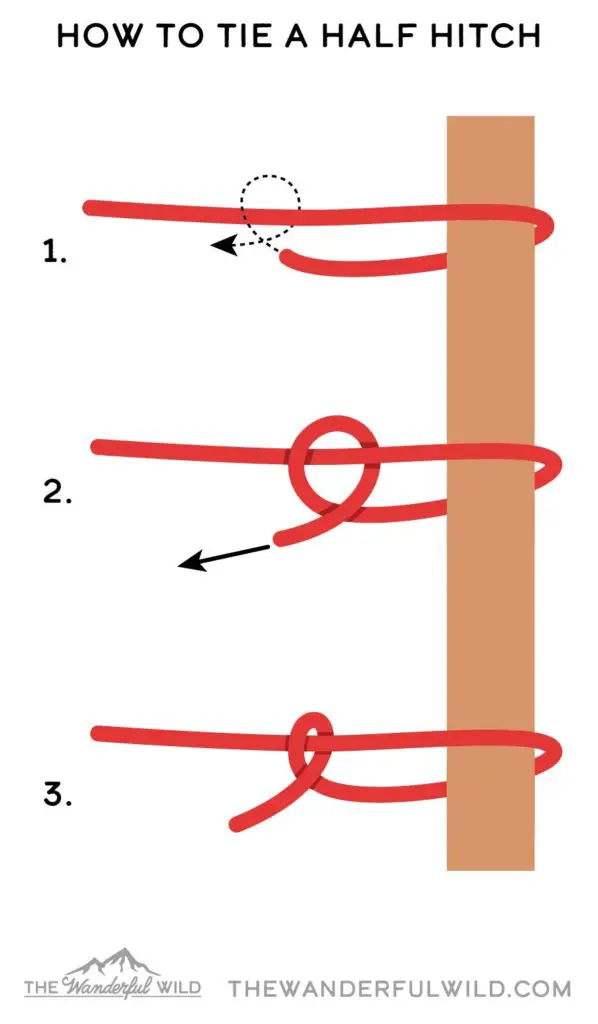
The half hitch is great for beginners because once you learn the half hitch, you automatically know how to tie a double half hitch. It’s a two-fer kind of deal. You tie the same knot twice to get a double half hitch. The purpose of the second knot is to secure the first half hitch knot you tied. This knot easily comes apart once the tension on the knot is released.
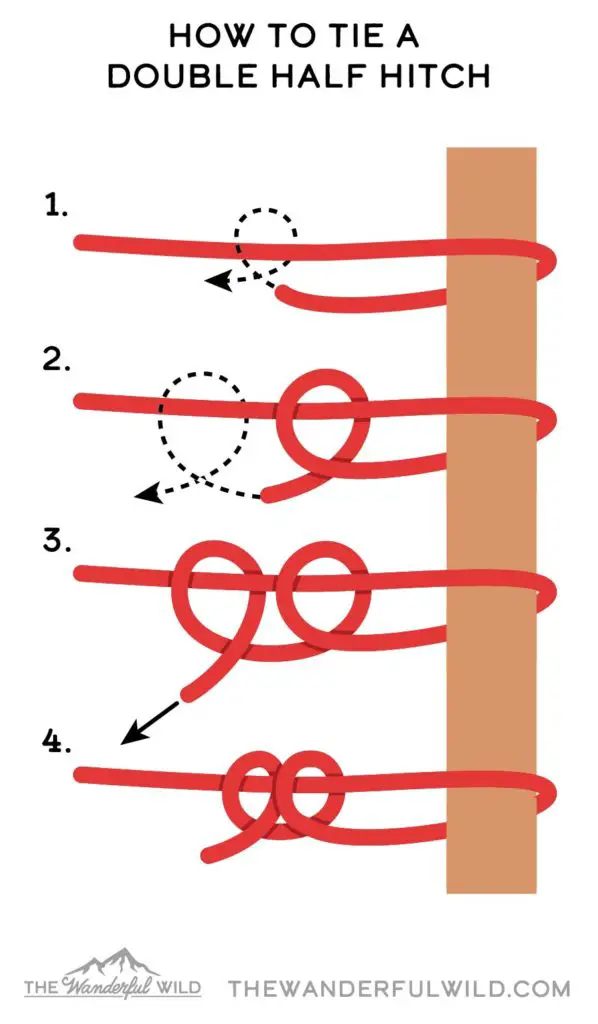
Hammock Uses: I use a double half hitch as my final knot to secure the cordage to the tree when I string my ridgeline. It doesn’t matter the type of ridgeline – CRL or SRL – I always use this knot. The half hitch camping knots are a must-know for all hammock campers.
Square Knot
The square knot, also sometimes called the reef knot, is a basic knot made up of two half knots that joins two pieces of cordage together. It is known as the joining knot and has many useful applications.
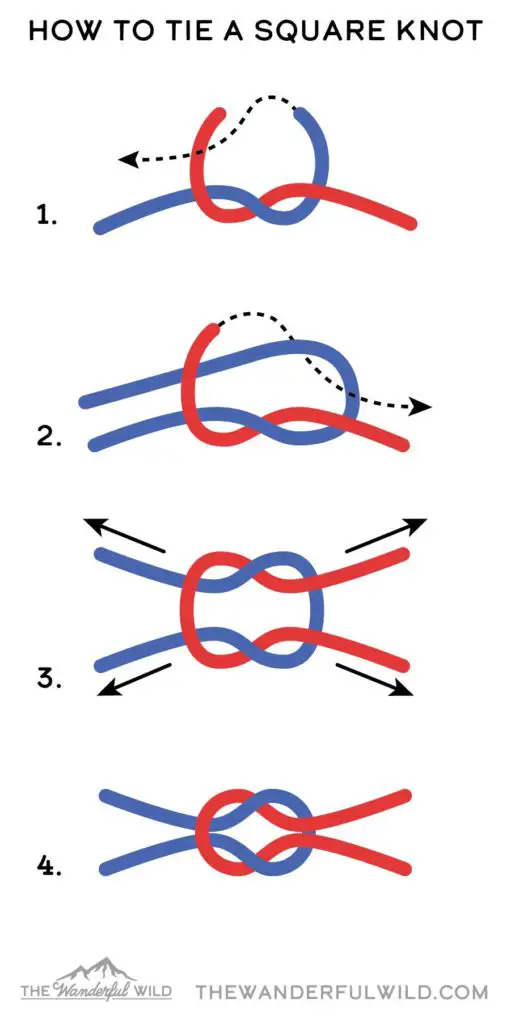
Hammock Uses: The square knot can be used to add length to a hammock ridgeline or guylines. If you ever find that your cordage isn’t quite long enough, you can use this basic knot to join two pieces of cordage together.
Lark’s Head Knot
A lark’s head knot, also called a cow hitch, is primarily used to attach cordage to an object or pole. This knot can be used to connect rope to objects or to suspend objects. Sometimes you need to hang something from a string, and this is a great knot to use for this purpose.
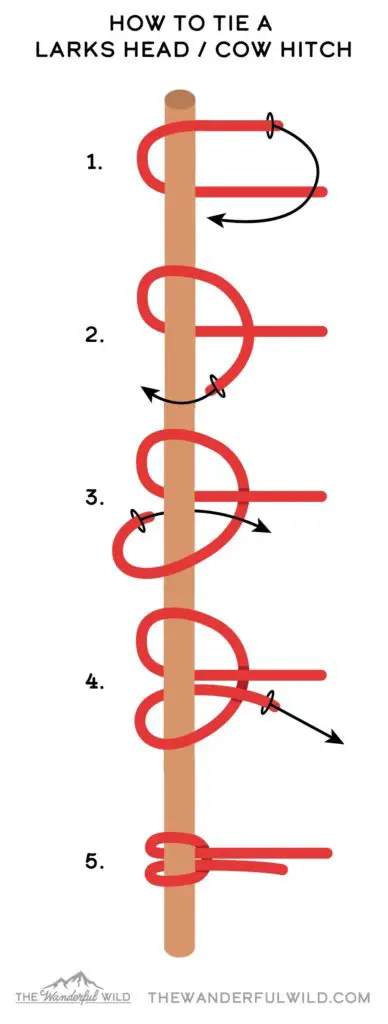
Hammock Uses: The lark’s head knot comes in useful for attaching gear to your ridgeline. You can create a loop with paracord or connect a piece of gear that has an open-loop then use a lark’s head to connect it. I use it a lot in tandem with a carabiner. Connect a flashlight or lamp to a carabiner with a lark’s head knot, then just clip it to where I need it. I also use a lark’s head to hang my pack from trees when I’m backpacking. Once you know this knot, you will be using it everywhere.
Taut-Line Hitch
Taut-line hitch is a great loop knot for when you need to have an adjustable loop. This knot is to be used only under tension – the knot is the strongest when force is applied. When the knot is not under tension, it can slide along the length of the line giving flexibility in the adjustment of the line. The adjustability of this loop knot is great for lines that tend to lose tension easily. The tension can be released on one side to bring the knot down the line and then released to strengthen the tension of the line again.
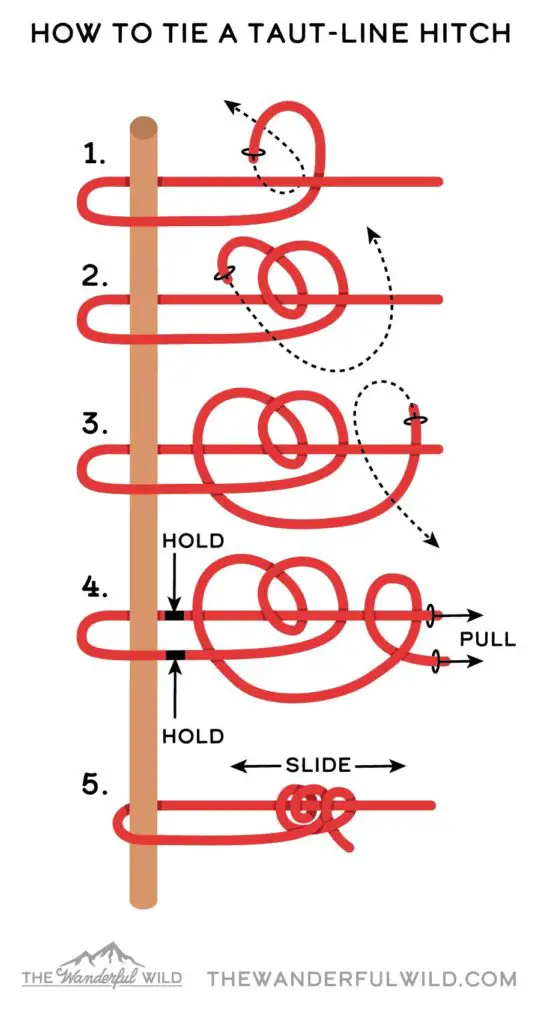
Hammock Uses: The taut-line hitch is an ideal loop knot for hammock camping. Ridgelines and guylines are known to lose their tension overnight or throughout the day. No matter what type of cordage you are using, it will start to stretch over time, and you will need to readjust it. It is for this reason that I love keeping this knot in my back pocket because you never know when you might need to draw a tight line. I typically only use this knot on one side of a ridgeline, so I’m only tightening one side to keep my tension.
Sheet Bend
The sheet bend is another type of joining knot used to join two pieces of cordage together. The difference and purpose of the sheet bend versus the square knot is the sheet bend is only used to tie two pieces of rope together that are different diameters, materials, or thickness. The sheet bend isn’t a knot that you will use all the time like some of the others in this list, BUT you will be thankful to know it when you need it. A quick note: practice this one often so it stays with you and you don’t forget how to do it.
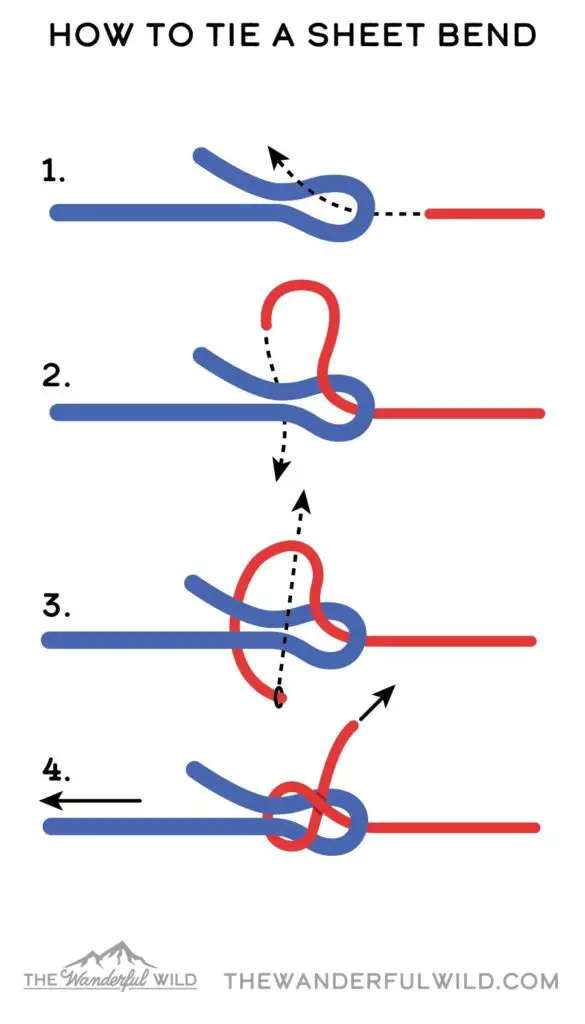
Hammock Uses: The sheet bend can be used in situations when you need to extend your lines and have run out of length of one type of cordage. As I said, you don’t appreciate this knot until you need it. I have been in multiple situations where I have run out of paracord or Zing-it and needed to grab some other sized cordage to extend my line.
Clove Hitch
The clove hitch, or sometimes called a double hitch, is a great knot to have in your arsenal. It is useful when the length of the working end of your cordage needs to be adjustable. This knot allows the cordage to be fed in from either direction, which will loosen the hitch and enable you to tighten it back down in a new place. The issue with this knot, depending on the cordage you use, is that it can sometimes slip. The clove hitch also works best on objects with a round diameter instead of a square. Wrapping this hitch around a square post is unreliable.
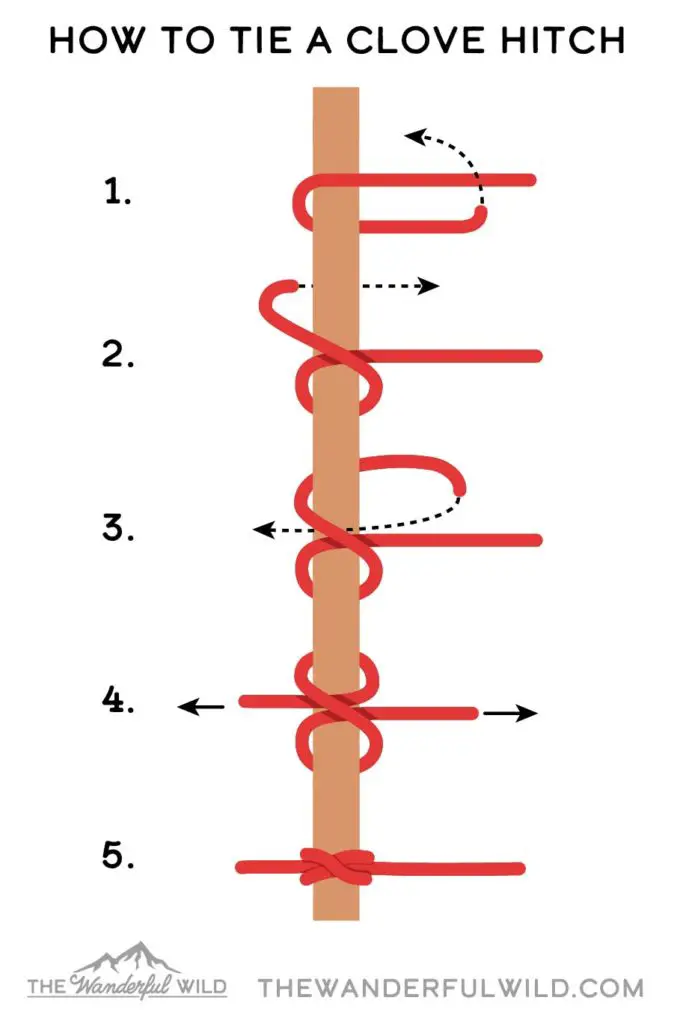
Hammock Uses: The clove hitch is a good knot to know when tying your guylines from your tarp to the stakes. Another great use of the clove hitch is if you are using straight straps for your hammock suspension, you can use this knot on a carabiner to hang your hammock. Just make sure you have it nice and secure before you use it.
Marlinspike Hitch
The marlinspike hitch is used as a temporary knot to attach a rod or spike to make a handle. The main purpose of the hitch is to allow more tension that allows for more leverage and grip than just a hand alone. The major advantages of using a marlinspike hitch is how easy the knot is to tie and also the ease of releasing the hitch. Rope ladders can easily be made using the marlinspike hitch.

Hammock Uses: The marlinspike hitch is a go-to knot when it comes to hammock campers. There are multiple ways to use the marlinspike. I use the marlinspike hitch a lot for my hammock suspension. I tie the hitch on my straps or webbing with a toggle of some kind (a piece of wood, carabiner, rod, etc.) then I will use a carabiner and hook it just above the knot. It’s vital that the carabiner is not on, or inside the knot or it will not hold the load. You can also use this knot on your ridgelines and your guylines for your tarp. This hitch can be used anywhere you have tension and need to connect something.
Bowline Knot
The bowline knot, also called the king’s knot, is a knot that creates a fixed eye loop and is able to hold heavy loads without slipping or loosening. The bowline is an essential camping knot to know and should be on your go-to list. The use of the bowline is considered in an extensive number of applications, including safety-critical applications. An advantage to the bowline is that it easily comes undone even after it’s been holding a heavy load. The disadvantage to the bowline knot is that it can loosen up when not under tension.
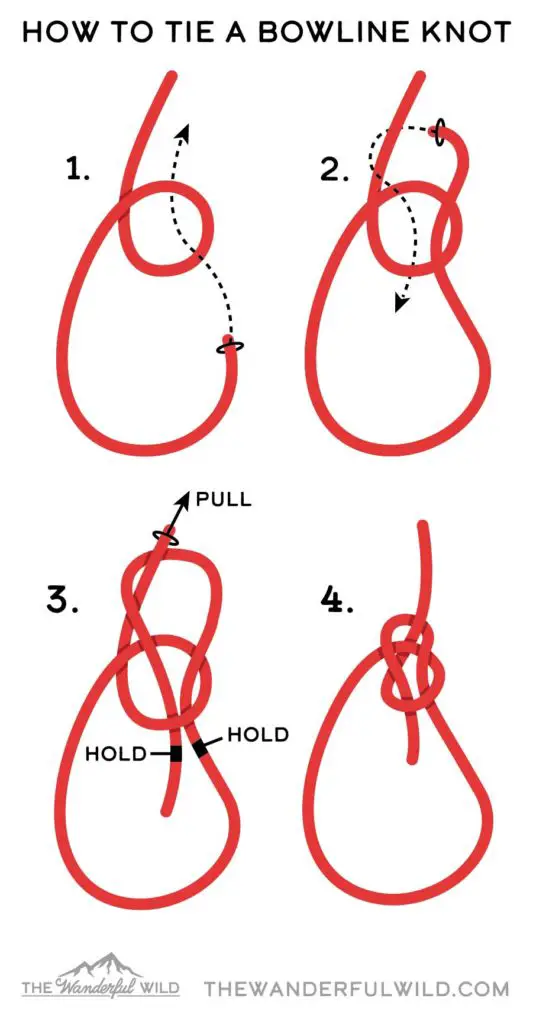
Hammock Uses: The bowline knot is my most used knot when it comes to hammock camping. I use it for one side of every ridgeline that I make. I create a bowline knot to create an eye, then use that eye to create a lark’s head knot, and then secure to the tree. I use the bowline combined with other knots on a regular basis. It is a great knot to practice for hammock camping.
Growing Your Knowledge
Knowing just the knots on this list will up your hammock camping game, I promise. Knots give you so much more versatility and adjustability. Not to mention, they are a fantastic life skill to have. Once you know your knots and their potential applications, you will find uses for them all the time in everyday life – not just for when you are outdoors or camping.
Just remember, practice makes perfect. Also, don’t stop at the basics. Go on and learn the more advanced knots as well. Teach your kids about them too. It’s an excellent activity to do together while you just sit and chat about life. Keep a small piece of paracord in your pocket and practice tying knots when you find yourself waiting or when you have a spare moment. It’s a great way to occupy your mind and much better than reaching for your phone. It also has a therapeutic nature about it – especially if you are like me and have to work on computers all day for work. Trust me, try it out.
No matter if you learn one new camping knot or decide to learn all of them, I hope this how-to guide helps you out in The Wanderful Wild.
